Theory: Arduino program structure and digital pins
What is different about Arduino programming?
A key difference between Arduino programming and PC programming is that we can read and control the state of the processor's pins.
- We can read whether a pin has voltage (digital on/off)
- We can control the voltage on individual processor pins (on Arduino Uno: 0V to 5V)
There are also special analog-to-digital pins (ADC pins), from which we can read voltage levels. We will cover ADC pins later.
Setup and loop functions
When you open the Arduino code editor, you will see two functions already created for you:
void setup() {
  // put your setup code here, to run once:
}

void loop() {
  // put your main code here, to run repeatedly:
}
setup: Runs once when the Arduino powers up. This is where you configure settings and initialize components.
loop: Runs repeatedly after setup completes. Use this for ongoing tasks: reacting to changes, reading sensors, and controlling components.
All code inside these functions is written between curly braces { }.
How to call functions
To make something happen in code, you call a function using this general form:
functionName(parameter1, parameter2);functionName— tells which function to executeparameters— values passed to the function;— semicolon ends the statement
Arduino provides many built‑in functions for common tasks. We'll explore creating your own functions later.
Controlling digital pins
The Arduino's physical electrical connections are called pins. With pins, Arduino can control external components and read sensor values. The pin number is usually printed on the PCB board's pin header. In a simulator, pins are on the edges of the Arduino board and their numbers are printed next to them.

At this stage, we use pins as simple on/off switches to control things like LEDs.
Two essential functions for digital pins:
pinMode(0, OUTPUT);   // Set pin '0' to OUTPUT mode

digitalWrite(0, HIGH); // Set pin voltage to HIGH (5V)
pinMode(pin, mode)— defines whether a pin is used asINPUTorOUTPUT:INPUT— means the pin state (whether it has 0V or 5V voltage) can be read programmatically. Using the commanddigitalRead, the program can read whether an external voltage connected to the pin is 5V (HIGH) or 0V (LOW).OUTPUT— means the pin can control voltage (0V or 5V). To drive an LED, we set the pin toOUTPUT.
digitalWrite(pin, state)— controls the voltage on anOUTPUTpin:HIGH— sets pin to 5V (power on)LOW— sets pin to 0V (power off)
To Do:
- Task 1: What changes are needed so that the red LED lights up?
💡 Learn more: LED anode/cathode documentation - Task 2: How can we make both LEDs turn on at the same time?
- Find the bug: Find and fix the error in the code to make the LED blink correctly.
- Solution: Check the corrected code and compare with your own solution.
⚠️ Important: You can check resistor values in the simulation by clicking on a resistor. Note that Wokwi does not verify if the resistor value is correct. If the resistor is too large, the LED will not light up. If it's too small, the LED can burn out (in real circuits).

Resistor value
LED pins: Anode (+) / Cathode (−)
Theory: Variables and Functions
The delay() function and loop
As mentioned in the basics section, loop runs repeatedly when the Arduino program executes. Sometimes it's necessary to wait a moment before proceeding to the next step. This is where the delay function is used.
delay(1000); // Wait 1000 millisecondsThe delay function takes a parameter in milliseconds and waits until the specified time has elapsed. During this time, no other code is executed, and the Arduino does nothing.
Variables
One essential concept in programming is variables. Variables are a way to store, for example, numeric values for the program to use.
Variables can be local or global. Global variables are visible throughout the entire code, while local variables are only visible within the code block where they are defined (for example, inside a function) and not outside it. A variable can also be static, meaning its value cannot be changed. More variable types will be introduced later, but for now we'll focus on these most important ones.
Defining variables in Arduino programming happens as follows:
int myVariable = 100;intdefines the variable type.myVariableis the variable name in this example. The variable name can be freely chosen.= 100sets the initial value for the variable. Note that, like a function call, this statement ends with a semicolon;
In Arduino programming, the variable type must always be defined. At this stage, we introduce three different variable types:
intvariables are integers and can have values between -32768 and 32767boolvariables are boolean values and can betrueorfalsefloatvariables represent decimal numbers
Changing variable values
As the name suggests, a variable's value can change during program execution. You can change a variable's value with code:
myVariable = 42;As you can see, setting a variable's value is similar to creating a new variable, except without defining the variable type.
Variables can also be used in mathematical operations and their values can be stored in other variables:
int myVariable = 100;
int anotherVariable = myVariable + 50; // After this, anotherVariable's value is 150
Variables can also be used to modify themselves:
int myVariable = 100;
myVariable = myVariable - 20; // After this, myVariable's value is 80
The biggest benefit comes from using variables as function parameters:
int pauseTime = 1000;
delay(pauseTime); // Wait 1000 milliseconds
Functions
Functions are reusable blocks of code that perform a specific task. Instead of writing the same code multiple times, you can create a function and call it whenever needed.
Creating your own function:
void myFunction(int parameter) {
  // Code to execute
  digitalWrite(0, HIGH);
  delay(parameter);
  digitalWrite(0, LOW);
  delay(parameter);
}
Calling the function:
void loop() {
  myFunction(500);  // Calls the function with 500ms timing
}void— means the function doesn't return a valuemyFunction— the function name (you choose this)(int parameter)— the parameter(s) the function accepts- Code inside
{ }is executed when the function is called
We will cover functions in more detail later, including return values and more advanced topics.
Variable naming rules
There are a few special rules for naming variables:
- Variable name cannot start with a number
- Variable cannot contain special characters or spaces, e.g.,
+ - * / # .However, underscore_is allowed. - Variable name is case-sensitive (uppercase and lowercase letters matter)
- Variable name cannot be a reserved keyword in Arduino programming language, e.g.,
int,bool,float,if,for, etc.
To Do:
- Task 1: Morse "S" using variables (three short blinks)
- Task 2: Morse "S" using functions and variables
- Find the bug: Find and fix two logical errors in the code
- Solution: Check the corrected code
Theory: Conditional statements
Introduction to conditionals
So far, the programs we've written have been linear in their execution. For our program to react to changes in its environment, we need conditional statements. Conditional statements, as the name suggests, set a condition based on which the program execution branches into two or more paths.
The if-statement
The simplest conditional statement is the if structure.
if (condition) {
  // If condition is true, execute code inside braces
}
The if structure starts with the reserved keyword if. After this, the condition to be evaluated is placed inside parentheses. Finally, the code to execute when the condition is met is placed inside curly braces.
Boolean conditions
The condition used in an if statement is evaluated as a boolean value (bool type). If the condition evaluates to true, the code inside the braces is executed. If it evaluates to false, the code inside the braces is skipped.
The condition in an if statement can also be a numeric value. In this case, zero (0) is read as false and any non-zero number (including negative numbers) is read as true.
💡 Note: In fact, true is also the number 1 and false is 0. This means you can use boolean values in arithmetic operations (though this is rarely needed).
Usually, you don't directly set the value to true or false in an if statement, but rather use it to monitor the state of a variable:
bool myVariable = true;

if (myVariable) {
  // Execute if myVariable is true
}
Comparison and boolean values
A common use case for if statements is examining and comparing numeric values. This way, we can produce boolean values from numeric values.
int myVariable = 100;

if (myVariable == 90) {
  // This won't execute because the if condition is false
}
In Arduino programming (and other programming languages), comparing numeric values is done using the following operators:
==— Equality. Result istrueif values are equal, otherwisefalse. Note the two==signs!>— Greater than. Result istrueif the left value is greater than the right value.<— Less than. Result istrueif the left value is less than the right value.>=— Greater than or equal to. Result istrueif the left value is greater than or equal to the right value.<=— Less than or equal to. Result istrueif the left value is less than or equal to the right value.!=— Not equal. Result istrueif values are different.
If you want to get the inverse of a boolean value, you can use the ! operator:
bool truthValue = false;

if (!truthValue) {
  // Code here executes because the inverse of false is true
}
If-else structure
Sometimes in a conditional statement you want to execute code even when the condition is not met. In this case, you can use the else structure in addition to the if structure.
if (condition) {
  // If condition is true, execute code inside braces
} else {
  // If condition was not true, execute this code
}
If the condition is true, the code inside the first set of braces is executed. If the condition is not true, the code inside the braces after else is executed.
If - else if - else
In addition to simple either-or comparisons, sometimes you need to react to multiple different situations. In this case, you can use else if sections in addition to if and else sections.
if (condition) {
  // Execute if condition is true
} else if (anotherCondition) {
  // Execute if anotherCondition is true
}
You can add as many else if sections as needed without limitations. After the else if sections, you can also add an else section if needed, which executes if none of the conditions are met.
if (condition) {
  // Execute if condition is true
} else if (anotherCondition) {
  // Execute if anotherCondition is true
} else if (thirdCondition) {
  // Execute if thirdCondition is true
} else {
  // Execute if none of the conditions are met
}
Complete example: Traffic light
Here's a practical example using comparison operators to create a traffic light. How should the loop function be modified to create working traffic lights?
// How should the loop function content be modified to create traffic lights?

int myVariable = 100;

void setup() {
  pinMode(0, OUTPUT); // Set pin '0' to OUTPUT mode
  pinMode(1, OUTPUT); // Set pin '1' to OUTPUT mode
  pinMode(2, OUTPUT); // Set pin '2' to OUTPUT mode

  if (myVariable != 100) { // Using comparison '!='
    digitalWrite(0, HIGH); // Turn on green light
  }

  if (myVariable < 30) { // Using comparison '<'
    digitalWrite(1, HIGH); // Turn on yellow light
  }

  if (myVariable >= 101) { // Using comparison '>='
    digitalWrite(2, HIGH); // Turn on red light
  }
}

void loop() {
  // Not needed in this exercise
}
Common errors with if-statements
"Anyone can make mistakes, but for a complete disaster, you need a computer."
⚠️ Typo errors (syntax errors):
- Using
=instead of==in comparisons - Forgetting curly braces
{ }around code blocks - Missing semicolon
;after statements inside the if-block - Confusing
>(greater than) with>>(bit shift operator) - Forgetting parentheses
( )around the condition
❌ Logical impossibilities:
- Checking if a value is both
> 100and< 50(impossible!) - Using
else ifwith conditions that can never be true based on previous conditions - Inverting logic with
!operator incorrectly, creating opposite behavior
To Do:
- Task 1: Use if-statement to check a condition
- Task 2: Use if-else to create two execution paths
- Find the bug: Find the bug and fix the code. Wiring is OK.
- Solution: Check the corrected code
What was fixed: Changed
pinMode(3, INPUT)topinMode(3, INPUT_PULLUP)INPUT_PULLUPsets the pin to 5V voltage using an internal pull-up resistor. This keeps the pin normally in HIGH state. When the pin is connected to ground (button pressed), its state changes to LOW.⚠️ Simulator limitations: In this example, the simulator doesn't operate correctly - it should not change the LED state without the INPUT_PULLUP setting. Additionally, simulators don't properly account for button bounce (when a button is pressed, it doesn't instantly change to 0V - achieving the final state takes time).
It's important to note that simulators only provide approximate results. All circuits must naturally be tested in real hardware. For example, the simulator doesn't verify if LED current-limiting resistors are correct - even if the resistor value were zero ohms or missing entirely, the simulator would still show "OK" results. In reality, the LED would burn out and the processor might be damaged.
Theory: Reading digital inputs
INPUT mode and external control
So far in the exercises, the Arduino has operated completely independently. But as mentioned earlier in the course, Arduino can also react to external control. At its simplest, this happens through the digitalRead() function.
pinMode(3, INPUT_PULLUP); // Set pin '3' to INPUT mode with pull-upThe digitalRead() function
For digitalRead to work correctly, the pin being read must first be set to INPUT mode. This means the pin cannot be controlled with digitalWrite(), but its value can be read with digitalRead().
void setup() {
  pinMode(3, INPUT_PULLUP); // Set pin '3' to INPUT mode
}

void loop() {
  int button = digitalRead(3); // Read pin 3 value and store in 'button' variable
}
Function return values
The functions we've used so far - pinMode(), digitalWrite(), and delay() - have only controlled Arduino's behavior. The newly introduced digitalRead() differs in that it's used to get information from the Arduino. In this case, the function "returns" the requested value. The returned value is stored in a variable and can be used later, for example in an if-statement.
int button = digitalRead(3); // Read pin 3 value and store in 'button' variableIn this code, pin 3's voltage is read using the digitalRead() function. digitalRead takes the pin number to read as a parameter and returns HIGH if voltage is connected, and LOW if voltage is not connected.
Using digitalRead with if-statements
The stored variable can be compared in an if-statement:
if (button == HIGH) { // Compare 'button' variable value
  digitalWrite(0, HIGH); // Turn green LED on
} else if (button == LOW) {
  digitalWrite(0, LOW); // Turn green LED off
}
Complete example
void setup() {
  pinMode(0, OUTPUT);       // Set pin '0' to OUTPUT mode
  pinMode(3, INPUT_PULLUP); // Set pin '3' to INPUT mode with pull-up
}

void loop() {
  int button = digitalRead(3); // Read pin 3 value and store in 'button' variable

  if (button == HIGH) { // Compare 'button' variable value
    digitalWrite(0, HIGH); // Turn green LED on
  } else if (button == LOW) { // Compare 'button' variable value
    digitalWrite(0, LOW); // Turn green LED off
  }
}
To Do:
- Task 1: Green button controls green LED on/off
- Task 2: Modify code so LED is normally ON, button turns it OFF
- Find the bug: Find and fix the digitalRead error
- Solution: Check the corrected code
Theory: While loop structure
Introduction to while loops
Sometimes in code, you need to wait for a condition to be met. This is where the while loop structure is used.
while (condition) {
  // Do things as long as condition is true
}
The while loop resembles the if structure in function, with the difference that the while loop's condition is checked over and over again until it is no longer true.
Counting iterations
By combining a while loop with a variable, you can achieve a limited number of iterations:
int iterations = 0;           // Initialize 'iterations' variable with value 0

while (iterations < 3) {      // Continue until three iterations are completed
  iterations = iterations + 1; // Increase iteration count by one

  // Code here will be executed three times
}
// Continue here when desired iterations are completed
In this code, the while loop is used to count iterations. When the iterations exceed the desired limit, the while loop's condition is no longer met, and code continues after the curly braces.
Waiting for a condition
Another use case for the while loop is to wait until something happens. This can be combined with, for example, the return value of the digitalRead() function.
while (digitalRead(3) == HIGH) {
  digitalWrite(0, HIGH);
}
digitalWrite(0, LOW);
In this code, the LED is kept on as long as pin 3 is connected to voltage. Note also that the digitalRead() function's return value is not separately stored in a variable, but is compared directly to the HIGH value.
Complete example
This code blinks an LED three times. How would you modify the code to make the LED blink five times?
void setup() {
  pinMode(0, OUTPUT);
}

void loop() {
  int count = 0;

  while (count < 3) {        // Blinks three times
    digitalWrite(0, HIGH);
    delay(200);
    digitalWrite(0, LOW);
    delay(200);
    count = count + 1;
  }

  delay(1000);              // Wait before repeating
}
Common mistake with while loops
The method used earlier with if-statements - storing the digitalRead() return value in a variable - doesn't work with while loops. Can you explain why?
❌ This doesn't work:
int button = digitalRead(3);
while (button == HIGH) {
  digitalWrite(0, HIGH);
}
digitalWrite(0, LOW);
The problem is that the button variable's value is not updated by calling digitalRead() again, so its value remains unchanged from iteration to iteration.
✅ Correct approach:
int button = digitalRead(3);
while (button == HIGH) {
  digitalWrite(0, HIGH);
  button = digitalRead(3);  // Update 'button' variable value
}
digitalWrite(0, LOW);
Here, the button value is updated at the end of each iteration before the next check of the while loop's condition.
To Do:
- Task 1: Modify code to repeat 5 times instead of 3
- Task 2: Use while loop with a condition variable
- Find the bug: Find and fix the variable increment placement error
- Solution: Check the corrected code (fixes count overrun error)
⚠️ Why overrun errors are hard to detect:
When
countis placed outside the while loop, the variable keeps incrementing every loop cycle. Sinceintis a 16-bit value (max 32767), after reaching the maximum, it wraps around to -32768 and continues. This means the conditioncount < 5will eventually be true again after overflowing, causing unpredictable behavior. The bug might not appear immediately and could work correctly for a while before failing, making it very difficult to debug.
Theory: Serial port communication
Introduction to Serial port
Sometimes it would be useful to get information about the program's operation stages while the program is running. On Arduino, this is possible using the serial port. The serial port enables communication between Arduino and the computer via the Arduino's USB cable - Arduino can send messages to the computer. This way you can monitor, for example, variable values during program execution.
Serial.begin() - Initialization
For Arduino to be able to send messages, its serial port must be enabled. This is done in the setup() function.
void setup() {
  Serial.begin(115200);
}
The Serial.begin() function initializes Arduino to use the serial port. The value 115200 specifies the serial port speed (baud rate).
⚠️ Important: The PC must have the same settings as Arduino. When using Arduino's Serial Monitor, both communication speeds (baud rate) must match. For other serial communication programs, see instructions on the Arduino website.
Serial.println() - Sending messages
Sending messages is done with the Serial.println() function.
void loop() {
  Serial.println(1);
  delay(1000);
}
This code repeatedly sends the number 1 once per second.
Printing text
The Serial.println() function can also print text.
Serial.println("This will be printed."); // Serial port prints "This will be printed."An empty Serial.println() function prints a blank line. This can be used, for example, to separate outputs from different loop() function runs.
Printing variable values
The Serial.println() function can also print variable values. This is especially useful when you want to monitor the state of a running program during its execution.
int myVariable = 1;           // Create variable and set its value to 1
Serial.println(myVariable);   // Serial port prints "1"
myVariable = 2;               // Reset variable value to 2
Serial.println(myVariable);   // Serial port prints "2"
You can also print float and boolean type variables with the println() function.
float decimalNumber = 1.1;    // Create float type variable and set value to 1.1
Serial.println(decimalNumber); // Serial port prints "1.1"

bool truthValue = true;       // Create boolean type variable and set value to true
Serial.println(truthValue);   // Serial port prints "1"
💡 Note: As you can see, a boolean variable actually stores its value as a number. Boolean has two values: true (1) and false (0).
Complete example
void setup() {
  Serial.begin(115200);  // Initialize serial communication at 115200 baud
}

void loop() {
  Serial.println(1);     // Send number 1 to serial monitor
  delay(1000);           // Wait 1 second
}
Two-way communication
Serial communication can be bidirectional - Arduino can not only send data to the computer, but also receive data from it. This enables interactive programs where the user can send commands or values to the Arduino.
The String variable type
To handle text data, we use the String variable type. String variables can store text (sequences of characters).
String message = "Hello"; // Create String variable with textReading from serial port
To read data sent from the computer, we use Serial.available() and Serial.readString():
Serial.available()— returns the number of bytes available to read. Returns > 0 if data is waiting.Serial.readString()— reads incoming text and waits until the user presses Enter (sends newline character).
Echo example (two-way communication)
// Serial communication example: Echo
void setup() {
  Serial.begin(115200);           // Initialize serial communication
  Serial.println("Ready to receive...");
}

void loop() {
  if (Serial.available() > 0) {   // Check if data is available
    String receivedText = Serial.readString();  // Read the text (waits for Enter)

    Serial.print("You sent: ");   // Print message
    Serial.println(receivedText); // Echo back what was received
  }
}
💡 Note: The code waits until the user presses Enter or sends a newline character (return). Type your message in the Serial Monitor and press Enter to send it.
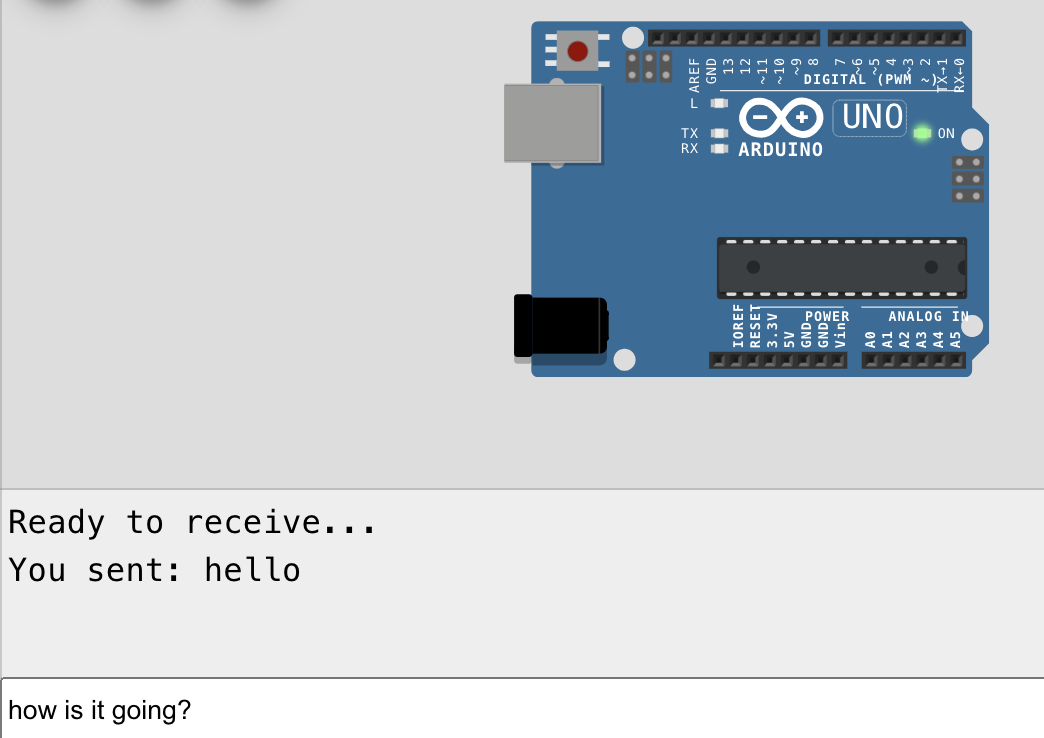
Type your message in the Serial Monitor input field and press Enter to send
To Do:
- Task 1: Send a number to serial monitor repeatedly
- Task 2: Send text and variable values to serial monitor
- Find the bug: Fix the output formatting error (print vs println)
- Communication: How to send data from PC to Arduino via serial?
Theory: Using Libraries
So far we have written all the code we need ourselves. However, it can sometimes be useful to borrow code written by someone else if it fits your own project. Instead of random searching and copying, it's better to rely on libraries published by others.
What is a library?
A library is program code made for a specific purpose, packaged in an easy-to-use form. Libraries provide functions and new types of variables that allow programs to focus on the program's own logic.
We have actually already been using libraries in this course. However, they are automatically available in the Arduino environment and do not need to be added separately.
void setup() {
  Serial.begin(115200);
}
For example, in this code snippet we use a library called Serial. With it, we don't have to think about how, for example, numbers are converted to a format suitable for printing to the serial port.
In this example, the Serial library provides us with a function called begin(), which starts the serial port at a certain speed. Also Serial.println() is a function provided by the Serial library. Library functions are used by placing a . (dot) between the library name and the function it provides.
Including libraries
The Arduino environment offers some built-in libraries that do not need to be added to the project separately. It is enough to enable them in the code using the #include command.
#include <SoftwareSerial.h>This enables a library called SoftwareSerial, which allows adding a new serial port to Arduino's other pins. Library names always end with .h and are enclosed between < and > characters.
Creating library objects
SoftwareSerial works slightly differently than the serial port we used before, as it must be initialized by creating a SoftwareSerial-type variable.
SoftwareSerial mySerial(8, 9); // Create new SoftwareSerial object on pins 8 and 9This creates a new SoftwareSerial-type variable that uses pins 8 and 9 to send and receive messages. Because we're using a library, we don't necessarily need to know how the serial port works internally, as long as we know how to select the required pins correctly. In this case, pin 8 is used for transmitting and pin 9 for receiving.
Using the library object
Otherwise, the SoftwareSerial port is used like a regular serial port:
void setup() {
  mySerial.begin(115200); // Start the serial port
}

void loop() {
  mySerial.println("Hello!"); // Write message to serial port
  delay(1000);
}
Adding libraries in Wokwi
In addition to Arduino's built-in libraries, there are tons of libraries available for different purposes. On the Wokwi platform, adding these is done from the Library Manager tab. From there you can search for libraries for different purposes and also view the libraries used in the exercises. In most of the exercises in this course, the necessary libraries (for example, for reading sensors) have been added in advance, but it's useful to know how to do this for your own projects.
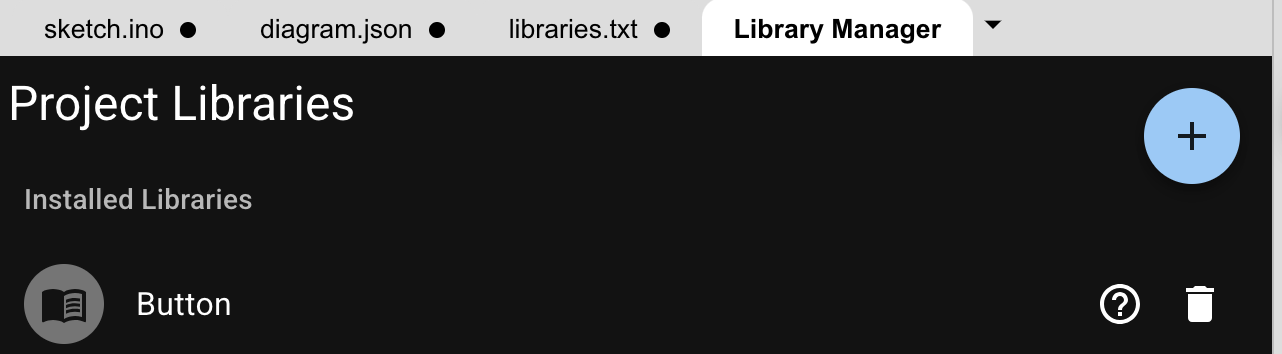
Click the "Library Manager" tab in Wokwi to search and add libraries to your project
⚠️ How to add a library: Click "Library Manager" → Search for the library name → Click the "+" button to add it to your project. The library will appear in the libraries.txt file.
To Do:
- Task 1: Use SoftwareSerial library to send messages to an external receiver
- Task 2: Add Button library from Library Manager and use its functions
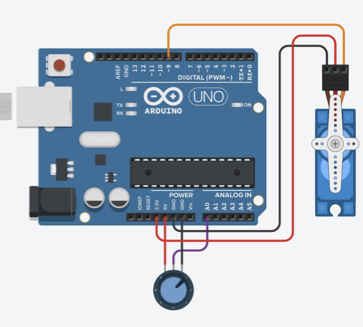
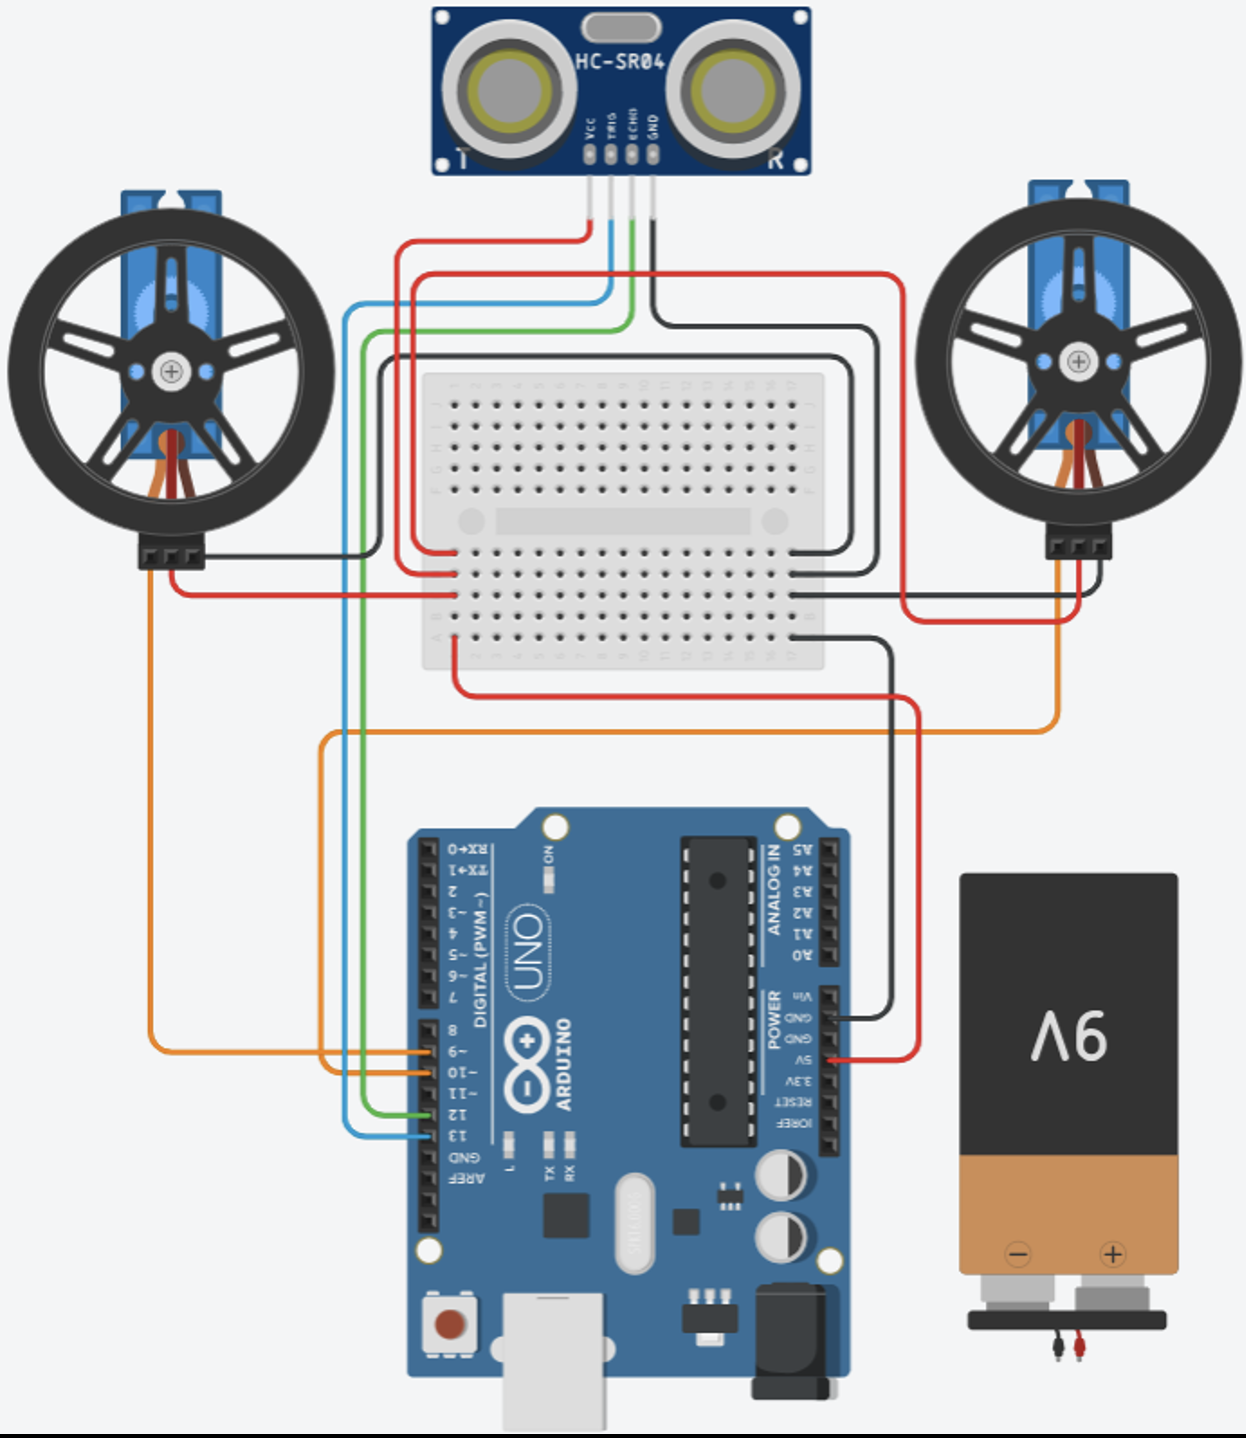
Theory: Servo Motors
Servo motors are motors whose position can be controlled. In code, this means that the servo is given a position, and the servo motor tries to maintain this position. This is especially useful if you want to build, for example, robots that move accurately in a specific way.
The Servo library
For Arduino to be able to control servo motors, it needs to set itself up to send the signal used by servos. This signal is precisely timed, and its implementation is complex for beginners. Fortunately, in programming you don't have to do everything yourself, and the code needed to control servos has been provided ready-made for all Arduino users. Such a ready-made code package is called a library.
Adding the Servo library in Wokwi
In the Wokwi editor, you can add libraries to your project from the Library Manager tab. From the "+" sign in the upper right corner of the view, you can search for and add libraries. Adding the Servo library is done by searching with the word "servo" and selecting the correct library. As you may notice, many libraries have been developed for controlling servos to choose from. However, for the purposes of this course, we will simply use the "Servo" library. In the examples and exercises, the library has already been added in advance, so you don't need to worry about this in the future. However, when doing your own projects, it's good to note the need to add libraries.
Using the Servo library
To use the added Servo library, it must be included in the code:
#include <Servo.h> // Add servo library to useHere #include means adding a library and Servo.h is the library name.
Creating a Servo object
After this, you can create a new Servo type variable:
Servo myServo; // Create a new servo variableHere Servo is the variable type, like the previously used int and bool, and myServo is the variable name. Like int type variables, Servo type variables can also be named as you wish. A Servo type variable provides functions that allow us to control how the servo operates.
Attaching the servo to a pin
To control the servo, Arduino must be told in the setup() function which pin the servo is connected to:
void setup() {
  myServo.attach(9); // Control servo using pin number 9
}
A Servo type variable has a function .attach(), which takes the pin number to which the servo is connected as a parameter. By placing a dot between the servo variable name and the function, we can control exactly the servo we want.
Controlling servo rotation
Controlling the servo is done with the Servo variable's .write() function. The .write() function takes the desired position of the servo in degrees between 0-180 degrees as a parameter.
💡 Servo position range: Standard servos accept values from 0 to 180. Where 0 is the minimum position (fully counter-clockwise), 90 is the middle position, and 180 is the maximum position (fully clockwise). You can use any integer value between these limits.
⚠️ Note about 360° servos: There are also continuous rotation servos (360° servos) that work differently. Instead of position, they accept a speed value where 90 is stop, values below 90 rotate in one direction, and values above 90 rotate in the other direction. However, Wokwi does not simulate these servos. We will work with continuous rotation servos in the next section when we start building physical devices.
void loop() {
  myServo.write(180); // Turn servo to maximum position
  delay(1000);        // Wait one second
  myServo.write(0);   // Turn servo to minimum position
  delay(1000);        // Wait one second
}
Complete example
#include <Servo.h>    // Add servo library

Servo myServo;        // Create servo variable

void setup() {
  myServo.attach(9);  // Attach servo to pin 9
}

void loop() {
  myServo.write(180); // Turn servo to 180 degrees
  delay(1000);        // Wait 1 second
  myServo.write(0);   // Turn servo to 0 degrees
  delay(1000);        // Wait 1 second
}
Multiple servo motors
In the basic course traffic light exercises, multiple LED lights were connected to Arduino. You can also connect multiple servos. In this case, a separate variable is created for each servo.
Servo servo1; // Create first servo variable
Servo servo2; // Create second servo variable
These are attached to pins one at a time:
void setup() {
  servo1.attach(9);  // Control servo using pin 9
  servo2.attach(10); // Control servo using pin 10
}
And control happens through each servo's own write() function:
void loop() {
  servo1.write(0);   // Turn first servo to minimum position
  servo2.write(0);   // Turn second servo to minimum position
  delay(1000);

  servo1.write(180); // Turn first servo to maximum position
  servo2.write(180); // Turn second servo to maximum position
  delay(1000);
}
💡 Tip: Each servo needs its own variable and pin. You can control servos independently by using their specific variable names (servo1.write(), servo2.write(), etc.).
To Do:
- Task 1: Control a servo motor to swing back and forth
- Task 2: Control servo position with intermediate angles
- Find the bug: Fix the servo control error
- Solution: Check the corrected code
Theory: Working with Sensors
Sensors allow Arduino to interact with the physical world by detecting changes in the environment. In this section, we'll explore three common sensors: PIR motion sensor, light sensor, and distance sensor.
1. PIR Motion Sensor
The PIR (Passive Infrared) sensor is a motion sensor based on measuring infrared radiation. It detects changes in the heat radiation from a human body in its environment. When someone steps into the sensor's detection area, the level of heat radiation changes and the sensor recognizes the movement. This makes the PIR sensor an excellent choice for controlling, for example, lighting, alarm systems, or automatic doors.
Reading PIR sensor values
The PIR sensor works by giving a signal whenever it detects motion. When the motion stops, the sensor's signal also stops. In Arduino code, the PIR sensor state can be read with the digitalRead() function.
void setup() {
  Serial.begin(115200);
  pinMode(8, INPUT);     // Set Arduino pin 8 to INPUT mode
}

void loop() {
  int sensorValue = digitalRead(8);  // Read PIR sensor value from pin 8
  Serial.println(sensorValue);       // Print PIR sensor value to serial port (prints 0 or 1)
  delay(500);                        // Wait 500 milliseconds
}
When running this code, you'll notice that the serial port prints 0 when no motion is detected, and 1 when motion is detected.
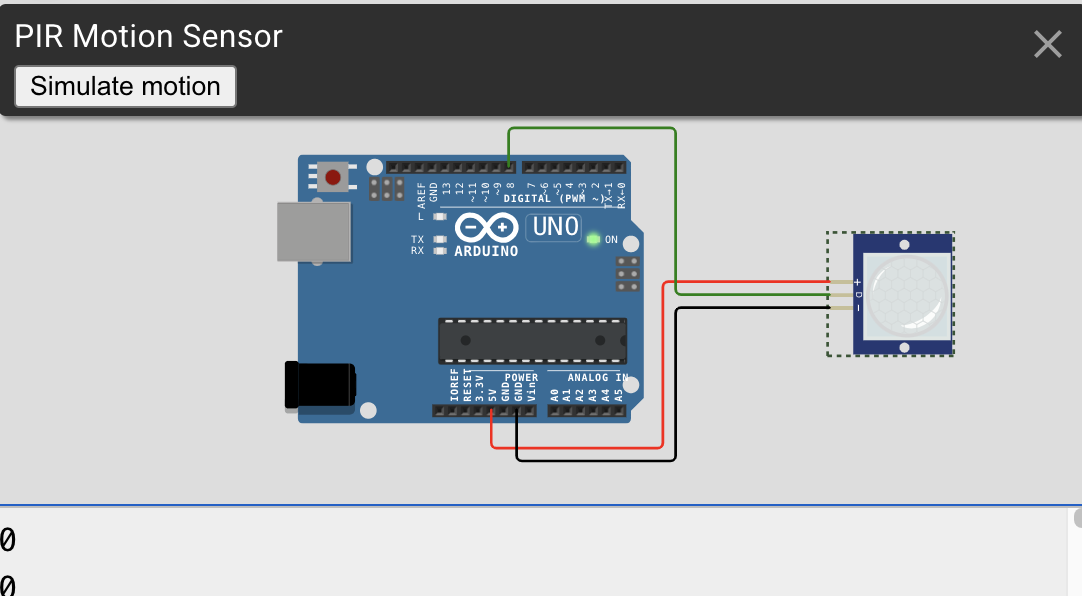
Click the sensor in Wokwi to simulate motion detection (PIR is a motion sensor)
💡 PIR sensor output: The sensor returns a digital signal: 0 = no motion detected, 1 = motion detected. This makes it easy to use with if-statements to trigger actions.
2. Light Sensor (Photoresistor)
A light sensor can be used to detect light and react accordingly. For example, you could control curtains based on sunlight, or turn on a night light in a dark room.
Using the light sensor as an ON/OFF detector
The light sensor used with Arduino is connected to a separate control circuit that can produce an ON/OFF type signal indicating whether the light is on or off. This can be easily read using the digitalRead() function.
void setup() {
  Serial.begin(115200);
  pinMode(8, INPUT);      // Set Arduino pin 8 to INPUT mode
}

void loop() {
  int sensorValue = digitalRead(8);  // Read light sensor value
  Serial.println(sensorValue);       // Print light sensor value to serial port
  delay(500);                        // Wait 500 milliseconds
}
When the light level is changed, you'll notice that in bright light the sensor gives a value of 0, and in dim light or darkness it gives a value of 1.
💡 Light sensor output: The sensor returns a digital signal: 0 = bright light detected, 1 = dim light or darkness. This inverted logic is common in light sensors with built-in comparator circuits.
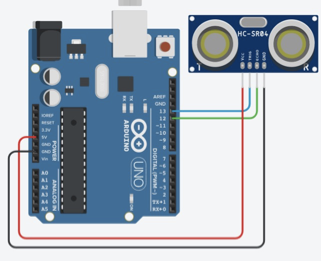
3. Distance Sensor (Ultrasonic HC-SR04)
The HC-SR04 ultrasonic sensor measures distance using sound waves. It sends an ultrasonic pulse and measures the time it takes for the echo to return. It's commonly used in robotics for obstacle detection and avoidance.
Reading distance with pulseIn()
The HC-SR04 sensor works by sending a trigger pulse and measuring the echo. We can read this directly without a library using the pulseIn() function.
const int trigPin = 10;
const int echoPin = 9;

void setup() {
  Serial.begin(9600);
  pinMode(trigPin, OUTPUT);
  pinMode(echoPin, INPUT);
  Serial.println("Distance Sensor Ready");
}

void loop() {
  // Send trigger pulse
  digitalWrite(trigPin, LOW);
  delayMicroseconds(2);
  digitalWrite(trigPin, HIGH);
  delayMicroseconds(10);
  digitalWrite(trigPin, LOW);

  // Read echo pulse
  long duration = pulseIn(echoPin, HIGH);

  // Calculate distance in cm
  int distance = duration * 0.034 / 2;

  Serial.print("Distance: ");
  Serial.print(distance);
  Serial.println(" cm");

  delay(500);
}
This code sends a trigger pulse, reads the echo time, and calculates the distance. The formula duration * 0.034 / 2 converts the time to centimeters (sound travels at 340 m/s, divided by 2 for round-trip).
💡 Distance sensor: The sensor measures distance in centimeters using ultrasonic waves. The pulseIn() function measures how long the echo pin stays HIGH. Useful for detecting obstacles, measuring levels, or creating interactive installations.
4. DHT22 Temperature and Humidity Sensor
The DHT22 sensor measures both temperature and humidity. It's widely used in weather stations, climate control systems, and environmental monitoring projects.
Using the DHT22 sensor library
The DHT22 sensor requires a library to read temperature and humidity values. The library simplifies communication with the sensor.
#include <DHT22.h>  // Include library for DHT22

DHT22 sensor(8);     // Create new sensor object on pin 8

void setup() {
  Serial.begin(115200);
}

void loop() {
  float temperature = sensor.getTemperature();  // Get temperature
  Serial.println(temperature);                  // Print to serial
  delay(2000);
}
This code reads the temperature every 2 seconds and prints it to the serial monitor. The DHT22 sensor needs at least 2 seconds between readings.
💡 DHT22 sensor: The sensor provides both temperature (°C) and humidity (%) readings. Use sensor.getTemperature() for temperature and sensor.getHumidity() for humidity. Always wait at least 2 seconds between readings.
Examples:
- PIR sensor: Motion detection with serial output
- Light sensor: Light-controlled LED
- Distance sensor: Ultrasonic distance measurement
- DHT22 sensor: Temperature and humidity reading
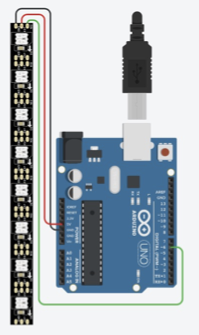
Theory: NeoPixel LED Strips
Welcome to the colorful part of the Arduino programming course! In this section, we'll learn to program NeoPixel LED strips.
This course assumes you have completed the basic Arduino beginner course. The course is implemented on the Wokwi programming platform.
Goal: Learn to control NeoPixel LED strips, set colors, and create various effects.
What is NeoPixel?
NeoPixel LED strips are colorful LED strips where each LED's color and brightness can be controlled individually. This is made possible by integrated processors in the LED lights that receive and transmit color data from LED to LED along the strip. This way, the strip can be given commands to control a specific LED's color and brightness.
NeoPixel LED strips can be used especially in smart lighting, decorative lighting, and light art.
NeoPixel Programming Basics
The first step in programming NeoPixel strips is to add the Adafruit_NeoPixel library, which provides all the necessary tools for controlling the strips. You can read more about using libraries in the "Using Libraries" section of the course.
#include <Adafruit_NeoPixel.h> // Add NeoPixel libraryCreating a NeoPixel object
Next, we create a new Adafruit_NeoPixel type variable and name it strip.
Adafruit_NeoPixel strip(16, 6, NEO_GRB + NEO_KHZ800); // Create new NeoPixel objectCreating the new variable happens with a function that takes as parameters:
- Number of LEDs (16 LEDs)
- Pin number where the strip is connected (pin 6)
- Strip-specific parameters (
NEO_GRB + NEO_KHZ800) - different manufacturers may require different values, but this is the most commonly working variation
Initializing NeoPixel in setup()
In the setup() function, we initialize the NeoPixel LED strip for use.
void setup() {
  strip.begin();                  // Start using NeoPixel
  strip.setBrightness(255);       // Set NeoPixel brightness to maximum
  uint32_t color = strip.Color(255, 0, 0);  // Create new color (red, green, blue)
  strip.setPixelColor(0, color);  // Set color to first NeoPixel
  strip.show();                   // Send colors to strip
}
Understanding the functions:
.begin()— Starts the strip.setBrightness(255)— Sets the brightness (0-255). Here set to maximum.uint32_t— A type for storing large positive integers, used here for RGB color values.Color(red, green, blue)— Combines RGB values into a NeoPixel color. For example, violet would bestrip.Color(255, 0, 255).setPixelColor(index, color)— Sets color to a specific LED. First parameter is LED number (starts from 0), second is the color.show()— Sends the color values from Arduino to the LEDs. Colors won't display until this is called!
⚠️ Important: LED numbering starts from 0! The first LED is 0, the second is 1, etc. For 16 LEDs, valid indices are 0-15.
Complete example
#include <Adafruit_NeoPixel.h>

Adafruit_NeoPixel strip(16, 6, NEO_GRB + NEO_KHZ800);

void setup() {
  strip.begin();
  strip.setBrightness(255);

  // Set first LED to red
  uint32_t red = strip.Color(255, 0, 0);
  strip.setPixelColor(0, red);

  strip.show();  // Display the colors
}

void loop() {
  // Leave empty for now
}
For-loop Control
A typical feature of NeoPixels is controlling individual LEDs based on their index number. If the strip has many LEDs, it becomes laborious to write a separate command for each LED.
strip.setPixelColor(0, color);  // Set color to first NeoPixel
strip.setPixelColor(1, color);  // Set color to second NeoPixel
strip.setPixelColor(2, color);  // Set color to third NeoPixel
strip.setPixelColor(3, color);  // Set color to fourth NeoPixel
// etc...
With the for-loop structure, we learned how to easily iterate through number sequences. We can use this with NeoPixel control as well.
for (int i = 0; i <= 7; i++) {  // Variable i gets values 0..7, suitable for controlling 8 LEDs
  strip.setPixelColor(i, color);  // Set color to NeoPixel indicated by i
}
💡 For-loop structure: for (int i = 0; i <= 7; i++) creates a loop where i starts at 0 and increases by 1 each iteration until it reaches 7. This is perfect for controlling multiple LEDs with just a few lines of code!
Examples:
- Basic NeoPixel: Light up one LED with a color
- For-loop: Control multiple LEDs with a loop
- Rainbow effect: Create a rainbow pattern
- Animation: Create moving light effects
Self-Test: Check Your Understanding
This is not an exam! This is a simple checklist of key concepts covered in Part 1. Use it to test your knowledge and identify areas you might want to review.
💡 How to use: Read through each concept. If you understand it, great! If not, go back to the relevant Task section and review.
Basic Arduino Concepts
- Pin: Physical leg of the processor whose voltage level can be read or controlled
- setup(): Function that runs once when Arduino starts
- loop(): Function that runs repeatedly after setup()
- pinMode(): Configures a pin as INPUT or OUTPUT
- digitalWrite(): Sets a digital pin to HIGH (5V) or LOW (0V)
- digitalRead(): Reads the state of a digital pin (returns HIGH or LOW)
- delay(): Pauses program execution for specified milliseconds
Variables and Data Types
- int: 16-bit signed integer on Arduino (-32,768 to 32,767)
- bool: Boolean variable type (true = 1, false = 0)
- float: 32-bit floating-point on Arduino (±3.4028235E+38, ~6-7 decimal precision)
- long: 32-bit signed integer (-2,147,483,648 to 2,147,483,647)
- String: Variable type for storing text
- uint32_t: Unsigned 32-bit integer on Arduino (0 to 4,294,967,295, used for NeoPixel colors)
- Global variable: Declared outside functions, accessible everywhere
- Local variable: Declared inside a function, only accessible within that function
- Static variable: Retains its value between function calls
Control Structures
- if-statement: Executes code block only if condition is true
- else: Executes code block when if-condition is false
- else if: Checks additional conditions when previous conditions are false
- while loop: Repeats code block while condition is true
- for loop: Repeats code block a specific number of times with a counter variable
- Comparison operators: ==, !=, <, >, <=, >= for comparing values
Functions
- Function: Reusable block of code with a name
- Parameter: Input value passed to a function
- Return value: Output value that a function gives back
- void: Function type that doesn't return a value
Serial Communication
- Serial port: Communication channel between Arduino and computer via USB
- Serial.begin(): Initializes serial communication with specified baud rate
- Baud rate: Communication speed (e.g., 115200) - must match on both devices
- Serial.println(): Sends text or numbers to serial monitor with newline
- Serial.print(): Sends data without newline
- Serial.available(): Returns number of bytes available to read
- Serial.readString(): Reads incoming text (waits for Enter key)
Libraries
- Library: Pre-written code package for specific purposes
- #include: Command to add a library to your code
- Library Manager: Tool in Wokwi for searching and adding libraries
- Object: Variable created from a library type (e.g., Servo, NeoPixel)
Components and Sensors
- INPUT mode: Pin configured to read signals from external sources
- OUTPUT mode: Pin configured to send signals to external components
- INPUT_PULLUP: INPUT mode with internal pull-up resistor enabled
- PIR sensor: Detects motion using infrared radiation (returns 0 or 1)
- Light sensor: Detects light levels (returns 0 for bright, 1 for dark)
- HC-SR04: Ultrasonic distance sensor (measures in centimeters)
- pulseIn(): Measures duration of a pulse on a pin
- DHT22 (or DHT11): Temperature and humidity sensor (requires library)
Servo Motors
- Servo motor: Motor whose position can be controlled (0-180 degrees)
- .attach(pin): Connects servo object to a specific pin
- .write(angle): Sets servo position in degrees (0-180)
- 360° servo: Continuous rotation servo (speed control, not position; 90 = no movement)
NeoPixel LED Strips
- NeoPixel: Individually addressable RGB LED strip
- .begin(): Initializes NeoPixel strip
- .setBrightness(): Sets overall brightness (0-255)
- .Color(r, g, b): Creates RGB color from red, green, blue values (0-255 each)
- .setPixelColor(index, color): Sets color to specific LED (index starts at 0)
- .show(): Updates the strip to display set colors
- RGB: Color model using Red, Green, Blue values
Programming Concepts
- Overflow: When a variable exceeds its maximum value and wraps around (e.g., int at 32,767 + 1 becomes -32,768)
- Index: Position number in a list or array (starts at 0)
- Iteration: One execution of a loop
- Condition: Expression that evaluates to true or false
- Syntax: Rules for writing code correctly
✅ Congratulations! If you understand most of these concepts, you're ready to move on to Basic arduino exercise!